2023. 4. 13. 10:29ㆍReact/실전 리엑트 프로그래밍
💻 리덕스 란?
상태관리 라이브러리입니다.
자세한 내용은 이전 포스팅에서 다뤘기에 생략하겠습니다.
[우아한 테크러닝 4기] redux 구현해보기
안녕하세요. 이번 포스팅에서는 제가 지금 참여하고 있는 우아한 테크러닝 4기에서 들었던 강의 내용을 다뤄보려 합니다! 이번 강의에서는 redux를 javaScript를 이용하여 간단하게 구현하면서, redux
keeper.tistory.com
이 리덕스 사용의 장점은 아래와 같습니다.
- 컴포넌트 코드로부터 상태관리 코드 분리
- 미들웨어를 이용한 다양한 기능 추가
- ex) redux-saga
- 로컬 스토리지에 데이터 저장 및 불러오기
- SSR시 데이터 전달이 간편
리덕스 상태값은 하나의 객체로 표현가능하여, 해당 객체만 문자열로 변환하여 서버에 넘겨주어 매우 간편
클라이언트는 하나의 객체로 만들어서 사용하면 됨
클라이언트에서 전체 애플리케이션 상태를 저장해서 불러오는 기능도 구현가능
과거의 상태를 저장했다가 과거의 상태로 돌아가는 것도 간단히 구현 가능
- 리액트 ContextAPI 보다 효율적인 렌더링
💡 Context API vs Redux
ContextAPI
import React, { userContext, createContext, useReducer } from 'react';

// 컨텍스트
const AppContext = createContext({});
const DispatchContext = createContext(() => {});

// 루트 컴포넌트
export default function App() {
  const [state, dispatch] = useReducer(reducer, INITIAL_STATE);
  return(
    <>
      <AppContext.Provider value={state}>
        <DispatchContext.Provider value={dispatch}>
          <User />
          <Product />
        </DispatchContext.Provider>
      </AppContext.Provider>
    </>
  );
}

// 리듀서
const INITIAL_STATE = {
  user: {name: 'horong'},
  produce: {name: 'Galaxy S20'},
}
function reducer(state, action) {
  switch (action.type) {
    case 'setUserName':
      return {
        ...state,
        user: {...state.user, name: action.name}}
  }
}
User 컴포넌트 내부
// User 컴포넌트
function User() {
  const { user } = useContext(AppContext);
  const dispatch = useContext(DispatchContext);
  return (
    <>
      <p>{user.name}</p>
      <button onClick={() => dispatch({ type: 'setUserName', name: 'hong' })}>
        사용자 이름 수정
      </button>
    </>
  )
}

// Product 컴포넌트
function Product() {
  const { product } = useContext(AppContext);
  return <p>{`제품 이름: ${product.name}`}</p>
}
❗ 하나의 context로 관리
👉 이러한 경우에 상태값이 하나만 바뀌어도 전체가 다시 렌더링 되는 문제 발생
👉 context API를 사용하는 경우에는 userContext / productContext 로 나눈다고 하더라도 데이터를 동적으로 다루어야 하는 경우에는 까다로움
Redux
import React from 'react';
import { createStore } from 'redux';
import { Provider, useSelector, useDispatch } from 'react-redux';

import rootReducer from './rootReducer'

// 루트 컴포넌트
export default function App() {
  return (
    <>
      <Provider store={store}>
        <User />
        <Product />
      </Provider>
    </>
  );
}

// 리듀서
const store = createStore(rootReducer);
User 컴포넌트 내부
// User 컴포넌트
function User() {
  const user = useSelector(state => state.user);
  const dispatch = useDispatch();

  return (
    <>
      <p>{user.name}</p>
      <button onClick={() => dispatch({ type: 'setUserName', name: 'hong' })}>
        사용자 이름 수정
      </button>
    </>
  );
}

// Product 컴포넌트
function Product() {
  const product = useSelector(state => state.product);
  return <p>{`제품 이름: ${product.name}`}</p>
}
❗ useContext 를 사용하던 부분을 상태값은 useSelector를 사용하고 상태값 변경함수는 useDispatch를 사용
👉 리덕스에서는 Context API를 사용하여 UserContext / ProductContex 로 나누지 않아도 렌더링이 효율적으로 동작
💻 액션, 미들웨어
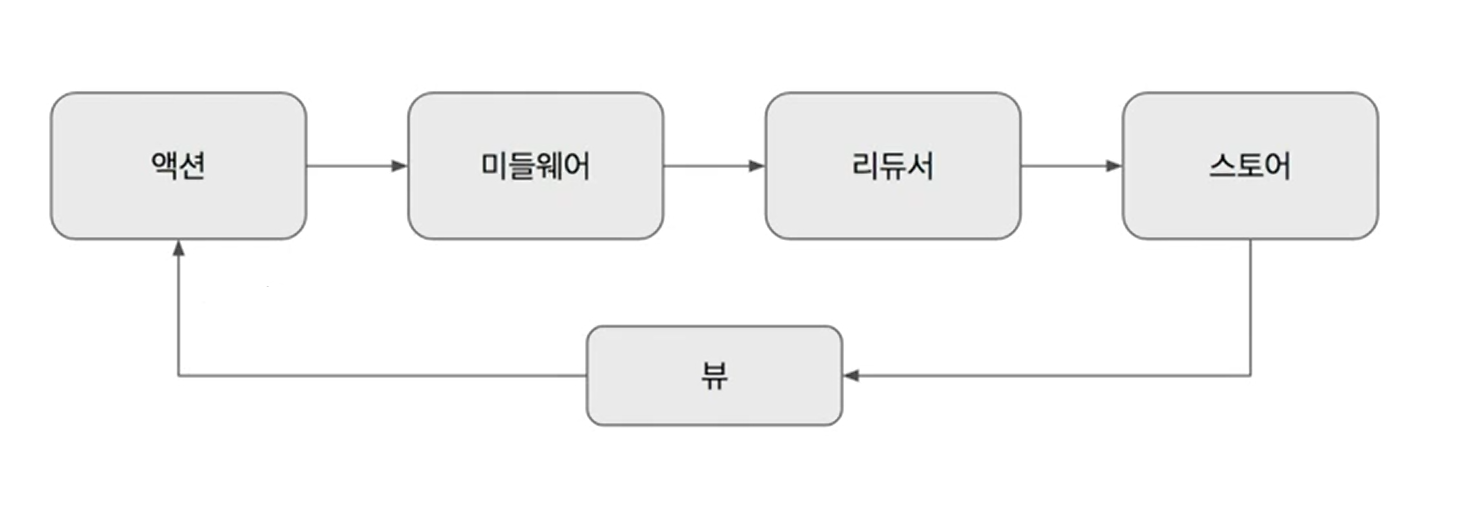
리덕스는 아래 4가지 요소가 있습니다.
- 액션 : "상태 변화를 위한 수행을 나타내는 객체"
- 미들웨어 : 액션 처리로, 여기서 여러가지 기능을 넣을 수 있습니다.
- 리듀서 : "스토어의 액션들을 수행하도록 해주는 함수"
- 스토어 : 상태 값들을 저장해두는 공간
>> 이렇게 하고 observer에게 데이터 변경의 사실을 알려줌
>> 데이터 변경이 안되어도 액션 발생 후 처리 끝나고 알려줌 >> 주로 뷰에게 알려줌
>> 그럼 뷰가 그 이벤트를 받아서 화면을 갱신
이들은 아래와 같은 단방향 흐름의 구조를 가집니다.
뷰에서 상탯값 변경 액션을 발생
👉 미들웨어가 액션 처리
👉 리듀서에서 액션의 상태값 변경 처리 및 새로운 상태값 반환
👉 스토어에 저장
💡 액션
"상태 변화를 위한 수행을 나타내는 객체"
액션 : type 속성 값을 가지고 있는 객체
dispatch : 액션이 발생했다는 것을 리덕스에게 알려주는 함수
type이외에 원하는대로 데이터들을 전달 가능 >> 데이터들은 리듀서에서 받아서 처리하는 것
type 속성은 unique해야함! >> 그래서 prefix를 붙여서 많이 사용~ ex) todo/~~
store.dispatch({ type: 'todo/ADD', title: '영화 보기', priority: 'high' });
store.dispatch({ type: 'todo/REMOVE', id: 123 });
store.dispatch({ type: 'todo/REMOVE_ALL' });
아래와 같이 액션을 구분하는 type과 액션에 사용되는 데이터를 가집니다.
{ type: 'todo/ADD', title: '...' }
{ type: 'todo/REMOVE', title: '...' }
대게 액션을 정의할 떄 action creator함수도 같이 생성
각 액션의 구조를 일관성 있게 만들기 위함!
👉 액션 생성시, 좀더 직관적으로 보여지도록 합니다
// 보통은 아래와 같이 action creator 함수를 작성하여
function addTodo({ title, priority }) {
  return { type: 'todo/ADD', title, priority };
}
function removeTodo({ id }) {
  return { type: 'todo/REMOVE', id };
}
function removeAllTodo() {
  return { type: 'todo/REMOVE_ALL' };
}
// 아래와 같이 사용함
store.dispatch(addTodo({ title: '영화 보기', priority: 'high' }));
store.dispatch(removeTodo({ id: 123 }));
store.dispatch(removeAllTodo());
다음과 같이 상수 변수로 만들어서 하면 훨 좋다!
export const ADD = 'todo/ADD';
export const REMOVE = 'todo/REMOVE';

export function addTodo({ title, priority }) {
  return { type: ADD, title, priority }
}
export function removeTodo({ id }) {
  return { type: REMOVE, id }
}
💡 미들웨어
미들웨어는 커링함수, 클로져함수의 형태를 가집니다.
이유는, action => next(action) 영역에서 store 와 next 를 사용하기 위함입니다.
const myMiddleware = store => next => action => next(action);몇가지 미들웨어의 예시를 살펴보겠습니다.
import { createStore, applyMiddleware } from "redux";
// 3 먼저 첫번쩨 미들웨어 실행
const middleware1 = (store) => (next) => (action) => {
  console.log("middleware1 start");
  const result = next(action); //  4 next이기때문에  middleware2 start 가 출력 //(store) => (next) => (action) 가 실행된거라고 생각하면 편함
  console.log("middleware1 end"); // 9 출력
  return result;
};
const middleware2 = (store) => (next) => (action) => {
  console.log("middleware2 start");
  const result = next(action); //  5 다음 미들웨어가 없어서 myReducer로 가는것임
  console.log("middleware2 end");
  return result; // 8 return 후 middleware1의 next로 다시가서 middleware1 end가 됨
};
const myReducer = (state, action) => {
  console.log("myReducer"); // 6 출력
  return state; // 7 다시 나가서 middleware2 end가 찍히게 됨
};
const store = createStore(myReducer, applyMiddleware(middleware1, middleware2));
// 1 action 발생시키는 간단한 코드
store.dispatch({ type: "someAction" }); // 2 action발생시, middleware부터 처리가 되는 것
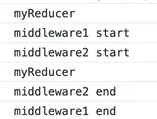
myReducer
reducer 인데, 초기에 상태값을 초기화하기 위해서
미들웨어없이 리듀서만 호출하는 단계가 있는데 그것 때문에 출력
dispatch를 호출했을때(액션이 발생했을 때) 아래의 다섯개가 호출 되는 것
middleware1 start
middleware2 start
myReducer
middleware2 end
middleware1 end
import React from "react";
import { applyMiddleware, createStore } from "redux";

// 4 printLog는 store를 매개변수로 받아 next 함수를 반환하는 함수
// 5 next 함수는 action을 매개변수로 받아 다음 미들웨어 또는 reducer함수를 호출하고, 그 결과를 반환
// 6 printLog 함수는 이 next 함수를 다시 매개변수로 받아 action을 실행하기 전과 후의 상태를 로그로 출력하고,
// next 함수의 반환값을 그대로 반환
const printLog = (store) => (next) => (action) => {
  console.log(`prev state = ${JSON.stringify(store.getState())}`);
  const result = next(action);
  console.log(`next state = ${JSON.stringify(store.getState())}`);
  return result;
};

const myReducer = (state = { name: "mike" }, action) => {
  console.log("myReducer");
  if (action.type === "someAction") {
    return { name: "mike2" };
  }
  return state;
};
// 1 Redux의 createStore 함수를 사용하여 store를 생성
// 2 첫 번째 인자로는 상태를 변경하는 함수인 reducer(myReducer)를 전달
// 3 두 번째 인자로는 미들웨어(applyMiddleware)를 전달
const store = createStore(myReducer, applyMiddleware(printLog));
// 7 이후 store.dispatch 함수를 사용하여 someAction 타입의 액션을 디스패치
// 이 액션은 myReducer 함수에서 처리되어 상태가 변경
store.dispatch({ type: "someAction" });

// 8 App 함수는 단순히 "실전 리액트" 문자열을 반환하는 컴포넌트
export default function App() {
  return <div>실전 리액트</div>;
}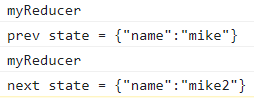
🔹 상태값 변경전 후의 값을 출력
// 미들웨어
const printLog = store => next => action => {
  console.log(`prev state = ${JSON.stringify(store.getState())}`);
  const result = next(action);
  console.log(`next state = ${JSON.stringify(store.getState())}`);
  return result;
}

// 리듀서
const myReducer = (state = { name: 'horong' }, action) => {
  console.log('myReducer');
  switch(action.type) {
    case 'someAction':
      return {...state, name:'horong123'}
    default:
      return state;
  }
  return state;
}

// 스토어
const store = createStore(myReducer, applyMiddleware(printLog));

// 액션 실행
store.dispatch({ type: 'someAction' })
예외 처리
const reportCrash = store => next => action => {
  try {
    return next(action);
  } catch (err) {
    // 서버로 예외 정보 전송
  }
};
import React from "react";
import { applyMiddleware, createStore } from "redux";
// action.meta에 delay라는 값이 있을 때
// setTimeout으로 딜레이를 해줘서 리듀서를 늦게 실행
// 만약에 없다면 호출을 하고 끝남
const delayAction = (store) => (next) => (action) => {
const delay = action.meta?.delay;
if (!delay) {
return next(action);
}
const timeoutId = setTimeout(() => next(action), delay);
// cancel을 통해 밖에서 next가 실행되는게 취소가 될 수 있게
return function cancel() {
clearTimeout(timeoutId);
};
};
const myReducer = (state = { name: "mike" }, action) => {
console.log("myReducer");
if (action.type === "someAction") {
return { name: "mike2" };
}
return state;
};
const store = createStore(myReducer, applyMiddleware(delayAction));
store.dispatch({ type: "someAction", meta: { delay: 3000 } });
export default function App() {
return <div>실전 리액트</div>;
}
3초의 텀을두고 위와 같이 출력됨
import React from "react";
import { applyMiddleware, createStore } from "redux";
// action.meta에 delay라는 값이 있을 때
// setTimeout으로 딜레이를 해줘서 리듀서를 늦게 실행
// 만약에 없다면 호출을 하고 끝남

const delayAction = (store) => (next) => (action) => {
  const delay = action.meta?.delay;
  if (!delay) {
    return next(action);
  }
  const timeoutId = setTimeout(() => next(action), delay);
  // cancel을 통해 밖에서 next가 실행되는게 취소가 될 수 있게
  return function cancel() {
    clearTimeout(timeoutId);
  };
};

const myReducer = (state = { name: "mike" }, action) => {
  console.log("myReducer");
  if (action.type === "someAction") {
    return { name: "mike2" };
  }
  return state;
};
const store = createStore(myReducer, applyMiddleware(delayAction));
const cancel = store.dispatch({ type: "someAction", meta: { delay: 3000 } });
cancel();

export default function App() {
  return <div>실전 리액트</div>;
}
위와같이 출력되고 끝남
🔹 로컬스토리지에 저장
// meta에 localStorageKey라는게 있으면, 액션 객체를 저장해줌
const saveToLocalStorage = (store) => (next) => (action) => {
  if (action.meta?.localStorageKey) {
    localStorage.setItem(action.meta?.localStorageKey, JSON.stringify(action));
  }
  return next(action);
};
// 미들웨어
const saveToLocalStorage = store => next => action => {
if (action.meta?.localStorageKey) {
localStorage.setItem(action.meta?.loaclStorageKey, JSON.stringify(action));
}
return next(action);
}
// 리듀서
const myReducer = (state = { name: 'horong' }, action) => {
console.log('myReducer');
switch(action.type) {
case 'someAction':
return {...state, name:'horong123'}
default:
return state;
}
return state;
}
// 스토어
const store = createStore(myReducer, applyMiddleware(saveToLocalStorage));
// 액션 실행
store.dispatch({
type: 'someAction',
title: 'asdf',
meta: { localStorageKey: 'myKey' }
});다음과 같이 mykey가 저장 됨

💻 리듀서, 스토어
💡 리듀서 : 액션이 발생했을 때 새로운 상태 값을 만드는 함수
리덕스의 상태값을 수정하는 유일한 방법 : 액션 객체와 함께 dispatch메서드를 호출하는 것, 다른방법안됨
상태값 : dispatch 메서드가 호출된 순서대로 리덕스 내부에서 변경되기 때문에 상태값이 변화되는 과정을 쉽게 이해할 수 있다. 불변객체로 관리
"스토어의 액션들을 수행하도록 해주는 함수"
액션 객체와 함께 dispatch 함수를 호출하여 리듀서 호출 가능
// 리듀서 함수
function reducer(state = INITIAL_STATE, action) {
  switch (action.type) {
    case REMOVE_ALL:
      return {
        ..state,
        todos: [],
      };
    case REMOVE:
      return {
        ..state,
        todos: state.todos.filter(todo => todo.id !== action.id),
      };
    default:
      return state;
  }
}

// 초기 상태값
const INITIAL_STATE = { todos: [] }
...state와 같이 항상 전개연산자를 사용해야함,
function reducer(state = INITIAL_STATE, action) {
  switch (action.type) {
    case ADD:
      return {
        ...state,
        todos: [
          ...state.todos,
          { id: getNewId(), title: action.title, priority: action.priority },
        ],
      };
    // ...
  }
}
근데 매번 사용하기 번거로움. 특 속성 값이 깊은 곳에 있다면...
❗ 여기서 주의해야할 점
반환하는 state값은 아래와 같은 이유로 불변객체로 관리해야합니다.
1. state 원본 값 변경은 제어 가능하도록 createStore내에서만 변경해야함
2. 값을 이전과 비교할떄 ===연산자로 비교해햐함
const state = {
  user: {
    name: "mike",
    friends: [
      {
        name: "jane",
        age: 23,
      },
      {
        name: "jake",
        age: 24,
      },
    ],
  },
  products: [],
};

// 다음과 같이 편리하게 비교가능
prevState.user.friends[0] === nextState.user.friends[1];
prevState.products === nextState.producs;
+ immer 패키지
전개연산자 대신 불변객체로 관리해주는 라이브러리
import produce from 'immer';

const person = { name: 'horong', age: 22 }; // 변경하고픈
const newPerson = produce(person, draft => {
  draft.age = 32 // 두번째는 상태값을 변경하는 로직
}) //newPerson는 새로운 객체가 되어 age가 32된 상태로 반환
상태값 수정 예시 >> immer 사용하면 훨씬 쉬움
import React from "react";
import produce from "immer";

const prevState = {
  user: {
    name: "mike",
    friends: [
      {
        name: "jane",
        age: 23,
      },
      {
        name: "jake",
        age: 24,
      },
    ],
  },
  products: [],
};
const nextState = produce(prevState, (draft) => {
  draft.user.friends[0].age = 32;
});
console.log("prevState === nextState", prevState === nextState); // false
console.log(
  "prevState.user.friends[0] === nextState.user.friends[0]",
  prevState.user.friends[0] === nextState.user.friends[0] //false
);
console.log(
  "prevState.user.friends[1] === nextState.user.friends[1]",
  prevState.user.friends[1] === nextState.user.friends[1] //true
);
console.log(
  "prevState.products === nextState.products",
  prevState.products === nextState.products //true
);

export default function App() {
  return <div>hello world</div>;
}
import produce from "immer";
// 전체를 produce로 감싸주고, 안에서 불변객체로 관리해야한다는 압박은 없어짐
function reducer(state = INITIAL_STATE, action) {
return produce(state, (draft) => {
switch (action.type) {
case ADD:
draft.todos.push(action.todo); // 수정
break;
case REMOVE_ALL:
draft.todos = [];
break;
case REMOVE:
draft.todos = draft.todos.filter((todo) => todo.id !== action.id); // 전개연산자 필요 없음
break;
default:
break;
}
});
}
❗ 리덕스 코드 작성시, 객체를 참조하지 말고, 객체의 고유 아이디를 참조
액션간의 객체 변경으로 새로운 객체가 생성될 경우, 값의 불일치가 일어날 수 있기 떄문
import produce from "immer";
function reducer(state = INITIAL_STATE, action) {
return produce(state, (draft) => {
switch (action.type) {
case SET_SELECTED_PEOPLE:
// draft.selectedPeople = draft.peopleList.find(
// (item) => item.id === action.id // id 수정
// ); // 객체를 가리킬 때에는 고유한 아이디 값을 이용하는 것이 좋음
// 그래서 객체의 레퍼런스가 아니라, 아이디값만 참조해서 값을 활용하면 좋음
draft.selectedPeople = action.id;
break;
case EDIT_PEOPLE_NAME:
const people = draft.peopleList.find((item) => item.id === action.id);
people.name = action.name;
// name 수정 시 people객체가 새로 만들어지는데,
// selectedPeople에서 참조하는 객체의 이름을 여기서 수정했을 때 객체가 새로 만들어졌지만, selectedPeople은 예전의 객체 레퍼런스를 들고있기 때문에
// name은 예전값을 참조하게 된다
break;
default:
break;
}
});
}
❗ 리듀서 함수는 순수함수로 작성
입력이 같을 때, 같은 출력 👉 random같은 값 사용 불가, 타임함수도 사용하지않는 것이 좋음
부수효과가 없어야함 👉 서버API 호출 불가
import produce from "immer";
function reducer(state = INITIAL_STATE, action) {
return produce(state, (draft) => {
switch (action.type) {
case SAY_HELLO:
const random = Math.floor(Math.random() * 10 + 1); //입력이 같을 때, 같은 출력 >> random이면!! 입력이 같아도 출력이 다를 수 있기에 사용하면 안됨
// 만약 원하면 action 객체 만들 때, random 데이터를 만들어서 넣으면됨
draft.msg = `안녕하세요, ${action.name}님의 행운의 숫자는 ${random}입니다.`;
break;
case INCREMENT:
callApi({ url: "/sendActionLog", data: action }); //서버API 호출 불가
draft.value += 1;
break;
default:
break;
}
});
}
💡 리듀서 생성함수
리덕스 사용시, createReducer를 이용
👉 리듀서 맵으로 코드의 양을 줄였고, 타입 변수를 관리할 필요를 없애서 또 코드의 양을 줄인다.
변경 전
import produce from "immer";

// 전체를 produce로 감싸주고, 안에서 불변객체로 관리해야한다는 압박은 없어짐
function reducer(state = INITIAL_STATE, action) {
  return produce(state, (draft) => {
    switch (action.type) {
      case ADD:
        draft.todos.push(action.todo); // 수정
        break;
      case REMOVE_ALL:
        draft.todos = [];
        break;
      case REMOVE:
        draft.todos = draft.todos.filter((todo) => todo.id !== action.id); // 전개연산자 필요 없음
        break;
      default:
        break;
    }
  });
}변경 후
import produce from 'immer';

// createReducer 정의하기
function createReducer(initialState, handlerMap) {
  return function(state = initialState, action) {
  // 리듀서를 produce로 감싸기
    return produce(state, draft => {
      const handler = handlerMap[action.type];
      if (handler) {
        handler(draft, action);
      }
    })
  }
}

// createReducer 사용하기
const reducer = createReducer(INITIAL_STATE, {
  [ADD]: (state, action) => state.todos.push(action.todo),
  [REMOVE_ALL]: state => (state.todos = []),
  [REMOVE]: (state, action) => state.todos.filter(todo => todo.id !== action.id),
});
💡 스토어 생성
createSotre함수 이용하여 생성
subscibe함수를 이용하여 값변경에 대한 함수이용가능
// 전체 코드를 App.js 에 붙여넣어서 테스트 해보세요
import { createStore } from "redux";
import { createReducer } from "./redux-helper";

const INITIAL_STATE = { value: 0 };
const reducer = createReducer(INITIAL_STATE, {
  INCREMENT: (state) => (state.value += 1),
});
// reducer에서 store 생성시 createStore 함수 이용하면 됨
// store - 상태값 저장, 액션 처리 끝남을 외부에 알려주는 역할
const store = createStore(reducer);

let prevState;
// 외부처리 끝남은 store의 subscribe메서드를 호출해서 아래와 같이 함수를 입력하면 됨
store.subscribe(() => {
  const state = store.getState();
  if (state === prevState) {
    console.log("상탯값 같음");
  } else {
    console.log("상탯값 변경됨");
  }
  prevState = state;
});

// 그래서 아래의 각 액션이 끝나고, store.subscribe함수가 호출 될 것임
store.dispatch({ type: "INCREMENT" });
store.dispatch({ type: "OTHER_ACTION" });
store.dispatch({ type: "INCREMENT" });

// 출력
// 상태값 변경됨
// 상태값 같음
// 상태값 변경됨
출처 : https://keeper.tistory.com/39?category=940178
[React.js] 리덕스(액션,미들웨어, 리듀서, 스토어)
💻 리덕스 란? 상태관리 라이브러리입니다. 자세한 내용은 이전 포스팅에서 다뤘기에 생략하겠습니다. https://keeper.tistory.com/27 [우아한 테크러닝 4기] redux 구현해보기 안녕하세요. 이번 포스팅에
keeper.tistory.com
'React > 실전 리엑트 프로그래밍' 카테고리의 다른 글
| [React.js]리액트_redux-saga (0) | 2023.04.13 |
|---|---|
| [React.js]리액트 react-redux, reselect라이브러리 (0) | 2023.04.13 |
| [React.js] 리액트의 useEffect 활용법 & 성능 최적화 방법 (1) | 2023.04.12 |
| [React.js]리액트 타입선언, 조건부 렌더링, 컴포넌트 재사용성 (0) | 2023.04.12 |
| [React.js]리액트 훅 규칙, Context API, 내장 훅 (0) | 2023.04.12 |