6-3. React에서 리스트 사용하기(Array.map((it)=><Component key={it.id}{...it}/>))
2022. 7. 4. 13:37ㆍReact/한입 크기로 잘라 먹는 리액트(React.js)
학습 목표
        {diaryList.map((it) => (
          <DiaryItem key={it.id} {...it} />
        ))}
map((it)) 기능을 통해서, list에 있는 데이터들을 모두 들고 올 수 있었고,
DiaryItem파일을 보면, 데이터들을 들고올 수 있음을 알 수 있다.
App.js
import React, {useState, useEffect} from 'react';
import DiaryEditor from './DiaryEditor';
import DiaryList from './DiaryList';
import "./App.css";

const dummyList = [
  {
    id: 1,
    author: "이정환",
    content: "하이 1",
    emotion: 5,
    created_date: new Date().getTime(),
  },
  {
    id: 2,
    author: "홍길동",
    content: "하이 2",
    emotion: 2,
    created_date: new Date().getTime(),
  },
  {
    id: 3,
    author: "아무개",
    content: "하이 3",
    emotion: 3,
    created_date: new Date().getTime(),
  },
];

const App = () =>  {
  return (
    <div className="App">
      <DiaryEditor />
      <DiaryList diaryList={dummyList} />
    </div>
  );
}

export default App;
DiaryEditor.js
import React, { useRef, useState } from "react";

const DiaryEditor = () => {
  const authorInput = useRef();
  const contentInput = useRef();

  const [state, setState] = useState({
    author: "",
    content: "",
    emotion: 1,
  });

  const handleChangeState = (e) => {
    setState({
      ...state,
      [e.target.name]: e.target.value,
    })
  }

  const handleSubmit = () => {
    if (state.author.length < 1) {
      // focus
      authorInput.current.focus();
      return;
    }
    if (state.content.length < 5) {
      contentInput.current.focus();
      // focus
      return;
    }
    alert("저장 성공");
  }

  return (
    <div className="DiaryEditor">
      <h2>✨오늘의 일기✨</h2>
      <div>
        <input
          ref={authorInput}
          name="author"
          value={state.author}
          onChange={handleChangeState}
        />
      </div>
      <div>
        <textarea
          ref={contentInput}
          name="content"
          value={state.content}
          onChange={handleChangeState}
        />
      </div>
      <div>
        <span>오늘의 감정점수 : </span>
        <select
          name="emotion"
          value={state.emotion}
          onChange={handleChangeState}
        >
          <option value={1}>1</option>
          <option value={2}>2</option>
          <option value={3}>3</option>
          <option value={4}>4</option>
          <option value={5}>5</option>
        </select>
      </div>
      <div>
        <button onClick={handleSubmit}>일기 저장하기</button>
      </div>
    </div>
  );
};
export default DiaryEditor;
DataList.js
import DiaryItem from "./DiaryItem";
const DiaryList = ({ diaryList }) => {
return (
<div className="DiaryList">
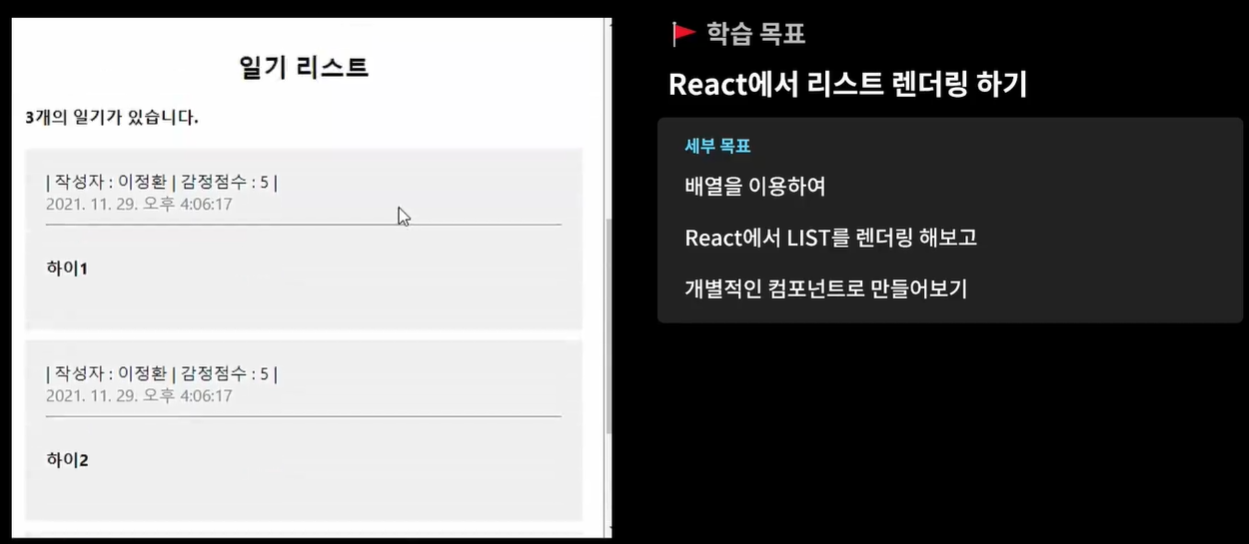
<h2>일기 리스트</h2>
<h4>{diaryList.length}개의 일기가 있습니다.</h4>
<div>
{diaryList.map((it) => (
<DiaryItem key={it.id} {...it} />
))}
</div>
</div>
);
};
// defaultProps는 undefined로 전달 될 수 있는 값을 default로 설정해주는 것
DiaryList.defaultProps = {
diaryList: []
}
export default DiaryList;DataItem.js
const DiaryItem = ({author, content, created_date, emotion, id}) => {
    return (
      <div className="DiaryItem">
        <div className="info">
          <span>
            작성자 : {author} | 감정점수: {emotion}
          </span>
          <br />
          <span className="date">{new Date(created_date).toLocaleString()}</span>
        </div>
        <div className="content">{content}</div>
      </div>
    );
};

export default DiaryItem;
App.css
.DiaryEditor {
    border: 1px solid gray;
    text-align: center;
    padding: 20px;
}

.DiaryEditor input, textarea {
    margin-bottom: 20px;
    width: 500px;
    padding: 10px;
}

.DiaryEditor textarea {
    height: 150px;
}

.DiaryEditor select {
    width: 300px;
    padding: 10px;
    margin-bottom: 20px;
}

.DiaryEditor button {
    width: 500px;
    padding: 10px;
    cursor: pointer;
}

/* LIST */
.DiaryList {
    border: 1px solid gray;
    padding: 20px;
    margin-top: 20px;
}

.DiaryList h2 {
    text-align: center;
}

/* ITEM */
.DiaryItem {
    background-color: rgb(240, 240, 240);
    margin-bottom: 10px;
    padding: 20px;
}

.DiaryItem .info {
    border-bottom: 1px solid gray;
    padding-bottom: 10px;
    margin-bottom: 10px;
}

.DiaryItem .date {
    color: gray;
}

.DiaryItem .content {
    font-weight: bold;
    margin-bottom: 30px;
    margin-top: 30px;
}
'React > 한입 크기로 잘라 먹는 리액트(React.js)' 카테고리의 다른 글
| 6-5. 리스트 데이터 삭제하기 (DELETE) (0) | 2022.07.05 |
|---|---|
| 6-4. 리스트 데이터 추가하기 (CREATE) (0) | 2022.07.04 |
| 6-2. React에서 DOM 조작하기 (useRef) (0) | 2022.07.04 |
| 6-1. React에서 사용자 입력 처리 (useState with <input />) (0) | 2022.07.01 |
| 6. React.js 기본 (일기장 만들어보기) (0) | 2022.07.01 |